Thursday, March 31, 2011

Baked Cucumbers...aka Concombres au Beurre

Who ever heard of baked cucumbers? Certainly not  me...until Julie & Julia became my favorite movie and I watched it six times in one month. Julie & Julia is a true story, based on the book, which was based on a blog by Julie Powell as she chronicled the year she spent cooking her way through Julia Child's "Mastering the Art of French Cooking." The movie combines the stories of both Julie Powell and Julia Child lives and is wonderful, inspiring and it makes me want to cook.

Which leads me back to Concombres au Beurre...a fancy French name for baked cucumbers. I know what you're thinking. "Eww...baked cucumbers." When I entertained the thought of making them, I withheld my "ewws" until I and my wonderful, guinea pig boyfriend could try them.

What I found out was that when cucumbers are baked they do not turn mushy and slimy, as I thought they would. They do not develop a sour flavor during the cooking process (did I think they would pickle themselves while baking?), like I thought they would. In fact, baked cucumbers are "a revelation" just like Julie Powell says in the movie. I thought I would make them once, say "ehh, they were okay" and let it go at that. But I will make them again and my boyfriend who, bless his heart, is willing to try everything I make, also gave them a thumbs-up.

This simple recipe calls for ingredients you most likely have around the house, so be brave and try it! Or, as Julia Child would say, "Have the courage of your convictions." The blend of cucumbers, vinegar, butter and seasonings turns out delicious and this side dish will work well with any type of fish, meat or poultry.

Concombres au Beurre (Baked Cucumbers)

Ingredients:

3 whole cucumbers, peeled (each about 8 inches long)
1 tbsp. white wine vinegar
3/4 tsp. salt
Pinch of sugar
1 1/2 tbsp. melted butter
1/2 tsp. dried basil
2 tbsp. chopped chives
Pinch of black pepper

Directions:

1. Cut the peeled cucumbers in half, lengthwise, and scrape a spoon over each half to remove the seeds.
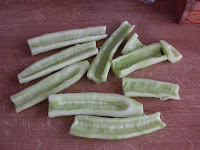
Peeled with seeds scooped out.
2. Cut each cucumber half into strips 1/2-inch wide and 2-inches long.

3. Place the cucumbers in a bowl. Add 1 tbsp. white wine vinegar, 3/4 tsp. salt and a pinch of sugar. Stir the ingredients together with a wooden spoon until the salt and vinegar mixture has coated all the cucumbers. Let the cucumber mixture sit for a minimum of 30 minutes and a maximum of overnight. The vinegar and salt bath draws excess moisture out of the cucumbers without compromising flavor and texture.


Marinating in the vinegar and salt bath.
 4. Drain the cucumbers then lay them in a single layer between two clean kitchen towels and pat dry.

5. Preheat the oven to 375 degrees Fahrenheit. Place the cucumbers in a 13-inch by 9-inch baking pan. Add 1 1/2 tbsp. melted butter, 1/2 tsp. dried basil, 2 tbsp. chopped chives and a pinch of black pepper. Toss the ingredients with a spoon until the seasonings and butter are evenly distributed over the cucumbers.


The "Before" Picture
 6. Bake the cucumbers in the oven for one hour, stirring them every 20 minutes, then spreading them back into a single layer.


Baked and ready to serve.

Julia Child...the French Chef
 Baked cucumbers are fresh and light, a definite no-guilt side dish, and the fragrance that wafts out of the kitchen as they bake is a delicious blend of cucumbers, butter and herbs. Julia Child hit the nail on the head, as far as Concombres au Beurre goes, when she said "Bon Appetit!"

Cooking Tip: I didn't have white wine vinegar and didn't feel like walking to the store to buy any. Instead, I substituted 2 tsp. white vinegar and 2 tsp. white wine. It tasted really good.

Because of the mild flavor of cucumbers, you can afford to err on the high side when it comes to adding seasonings. A little more than what is called for wouldn't hurt and I might try a little dill mixed in there the next time.

Give these a try and let me know what you think in the "comments" section.

Tuesday, March 22, 2011

The World's Best Lemon Bars

Heaven exists, and I've found it inside a tart, lemon filling nestled against a buttery, shortbread crust and dusted with sweet, powdered sugar. "The World's Best Lemon Bars", claimed the recipe title. But would it stand up to its claim? With a few minor adjustments on my part, the answer is a resounding "yes!!!"


Lemon bars are a happy medium for those who can't decide between cake or cookies. They are like an edible version of a great dress shirt....you can pair it with slacks or a skirt and look all jazzed-up, or wear it with jeans and look polished but still be casual. Lemon bars offer the same versatility and are equally delicious whether served with milk at the kitchen table or alongside tea and finger-sandwiches at a high-brow get-together.


The popularity of shortbread crust and lemon curd, both British favorites, date back to Renaissance times. But the lemon bars of today were most likely created in a United States kitchen sometime during the 1960s.


Depending upon your taste preferences, these lemon bars can be made sweeter or more tart. As is, I thought they were the perfect blend of soft, tart, lemony filling and sweet, buttery, shortbread crust. Having a difficult day? Meeting didn't go well? Kids are being a pain? Put a few lemon bars on your plate and, if only for a little while, all is suddenly right with the world.


Ingredients:


1 cup butter, softened
1/2 cup white sugar
2 cups all-purpose flour
2 tbsp. milk (optional)
4 eggs
1 1/2 cups white sugar
1/4 cup all-purpose flour
1/2 cup lemon juice (1/3 c. for less-tart bars, 2/3 c. for mouth-puckering tart)
Powdered sugar

Directions:

1. Preheat the oven to 350 degrees Fahrenheit.

2. In a mixing bowl, stir together the soft butter, 1/2 cup sugar and 2 cups flour. Once it's thoroughly mixed, the dough will look like small pellets. To me, it seemed too dry, so I added 2 tbsp. milk to make the dough more pliable. This turned out perfect.


Shortbread crust pressed into the pan and ready to bake.

3. Press the crust dough into the bottom of an ungreased 13-inch by 9-inch pan to form a thick crust. Bake for 20 to 25 minutes until the crust is firm and lightly golden.

4. While the crust is baking, whisk together the 4 eggs, 1 1/2 cups sugar, 1/4 cup flour and 1/2 cup lemon juice. Pour the lemon filling into the crust as soon as you remove the pan from the oven.

The lemon filling is liquid-y when you pour it in and firms up once it comes out of the oven.
5. Return the pan to the oven and bake for another 20 minutes. Remove from the oven and immediately dust the top of the bars with powdered sugar. Allow the lemon bars to cool on the countertop for 30 minutes before slicing.

The finished product, fresh out of the oven and sprinkled with powdered sugar.
Baking Tips: Never substitute margarine for butter. You'll lose far more in taste than you'll save in money.

Slice the bars, put layers of them in a lid-covered storage container (with wax paper between each layer), and keep in the refrigerator. The bars are easier to slice before you refrigerate them but taste even more refreshing and delicious when cold. If you refrigerate the bars first, then slice them later, it's much harder to get the bars out of the pan. I learned this the hard way.


Scrumptious layers of shortbread, lemon filling, and powdered sugar.

Warning: It's easy to eat a lot of these in one sitting because the tartness of the lemon balances the butteriness of the crust. But don't be fooled! Too much of a good thing here results in a lemon bar stomach ache....these are RICH! I can vouch for this from personal experience.

And, as we say in the good 'ole US of A...."help yourself...one more bar won't hurt you!"

Sunday, March 13, 2011

Cabbage Rolls Like Babka Made Them


Fresh out of the pan and ready to eat!
 Babka's Cabbage Rolls


Cabbage is one of the oldest known vegetables in the world. Remnants of cabbage leaves were found inside old clay pots dating back to 4000 B.C. China. While the exact origin of cabbage rolls is unknown, it's almost certain this dish originated somewhere in Europe.

In Croatia, cabbage rolls are a staple part of the diet and a favorite Christmastime dish, cooked with smoked ground pork. Ukrainians fill their cabbage rolls with rice only, while the Swedes and Finns serve theirs with lingonberry jam for a sweet and sour combination.

Most cabbage rolls are round in shape but the Lebanese fill theirs with meat and rice then roll them up like cigars. Rather than cook them in tomato-based sauce like Eastern Europeans or Americans, the people of Lebanon serve their cigar-shaped cabbage rolls with a side of plain yogurt and a lemon and olive oil vinairgrette dressing seasoned with garlic and dried mint.

My version of cabbage rolls is closest to the kind made and served in Poland and Croatia. The recipe is a combination of a few recipes I like. What I like about this recipe is its flexibility. If I feel like enjoying a slightly different flavor I need only add half a teaspoon or so of dried rosemary, or parsley, or curry....or whatever else my tastebuds are calling for. But mostly, I stick to this recipe because I believe in the old adage "if ain't broke, don't fix it."

Ingredients:

2 lbs. ground meat (beef, pork, turkey or a combination)
1 onion, finely chopped
2 cloves garlic, chopped
3/4 cup uncooked white rice
1 cup water
Salt
Black pepper
1 large head green cabbage
32 ounces sauerkraut
16 ounces beer (anything but dark)

Directions:

1. Combine the ground meat, chopped onion, chopped garlic, uncooked rice, water and salt and pepper to taste. Mix well then set aside.

2. Boil water in a large pot. Carefully peel off 15 to 20 cabbage leaves and boil them until soft, about 2 to 3 minutes. Or, you can do like I do: place the entire head of cabbage in the boiling water and peel off a few softened leaves at a time with two forks. Continue the process of boiling and peeling until you've gotten enough leaves. Be careful because the cabbage will be hot. I do it this way because I have better luck keeping the leaves intact.

3. Make a round ball of meat and place it in the middle of the cabbage leaf, a few inches from the end. Vary the size of the ball of meat in proportion with the size of the cabbage leaf. Fold in the sides then roll up the leaf from the end. When done like this you do not need to use toothpicks to hold the cabbage rolls together.

4. Cover the bottom of your pan or dutch oven with half of the sauerkraut. Arrange the cabbage rolls in a single layer, over the sauerkraut,with the folded side of the rolls facing down. Spread the remainder of the sauerkraut over the cabbage rolls.

5. Pour the beer over the cabbage rolls. Cover the pan tightly with a lid to keep moisture in. Bring the cabbage rolls to a boil then lower the heat and allow them to simmer for 90 minutes.

Cooking Tip: Cut the core out of the raw cabbage and boil. As the leaves soften they easily slip away from each other.

Dining Tip: You can serve these with mashed or boiled potatoes but they make a filling meal in and of themselves. Enjoy with Zinfandel.


Smacznego!!! That's Polish for "enjoy your meal"! And before I forget, "Babka" is Polish for "grandmother".

Saturday, March 12, 2011

Ratatouille- Simple and Healthy French Cooking

"The best way to execute French cooking is to get good and loaded and whack the hell out of a chicken. Bon appétit." ~Julia Child

When most people think of French food, cream sauces and butter-laden dishes come to mind. But not all French dishes are heavy and rich. Au contraire....(that's French for "on the contrary) a great deal of French fare is actually quite healthy.


I was first introduced to ratatouille in the 1970s by my health-conscious mother. She regularly served my family vegetarian or lean-meat dishes while the other kids on the block dined on hamburgers, macaroni and cheese, and fried boloney. I was none too happy about eating ratatouille back then but, as an adult, have grown to love this dish that's both a feast for the eyes as well as the palate.


Ratatouille (pronounced rat-a-too-ee) is widely known as a French dish though it can be traced back to the Basque people who introduced it to the French in pre-Roman times. The name "ratatouille" comes from the French word "touiller" which means "to toss". Disney Pixar's film of the same name about a rat who dreamed of being a chef brought about a resurgence in the popularity of ratatouille.

Though ratatouille is sometimes described as a stewed dish, this recipe involves more of a saute-before-baking process. After briefly sauteeing the vegetables in olive oil, each layer of mushroom, green pepper, tomato, onion, zucchini and eggplant is generously sprinkled with Parmesan cheese. As the dish bakes in the oven, the cheese bubbles and melts throughout while browning ever so lightly on the top.

There's no guilt involved in devouring this dish from the Provence Region of France. One serving is only 273 calories and filling enough to make a meal in and of itself.


Ratatouille

Ingredients:

2 tbsp. olive oil
3 cloves garlic, minced
2 tsp dried parsley
1 eggplant, chopped into cubes
salt to taste
1 cup grated Parmesan cheese
2 zucchini, sliced
1 large onion, sliced into rings
2 cups sliced fresh mushrooms
1 green bell pepper, sliced
2 large tomatoes, sliced

Directions:

1. Preheat the oven to 350 degrees Fahrenheit. Rub 1 tbsp. of the olive oil on the bottom and sides of your baking pan.


2. Heat the rest of the olive oil in a skillet over medium heat. Saute the garlic and onion slices until lightly brown. Mix in the parsley and eggplant and continue to saute about 10 more minutes, until the eggplant is soft. Sprinkle salt to taste over the sauteed vegetables.


3. Spread the eggplant, onion and garlic mixture over the bottom of a baking pan or casserole. Sprinkle 2 to 3 tbsp. Parmesan cheese over the eggplant layer. Place the sliced zucchini over the cheese for another layer, then salt lightly and add another layer of Parmesan cheese. Continue the layering process with the mushrooms, bell peppers and tomatoes. Add a layer of Parmesan cheese in between each vegetable layer as well as on top of the final layer.


4. Bake for 45 minutes in a covered baking pan or casserole. Remove the lid for the last five minutes of baking to allow the cheese to brown.

Cooking Tip: Substitute red, yellow or orange bell peppers for green and sliced yellow summer squash for the zucchini.


Dining Tip: Serve with Sauvignon Blanc and a side of crusty, French bread.


Bon appétit!!

Sunday, March 6, 2011

Dutch Apple Pie- Yes, You CAN Bake a Homemade Pie!

“Good apple pies are a considerable part of our domestic happiness." ~Jane Austen

I know what you're thinking: "I can't make a pie crust!"

To which I respond: "Then this is the recipe for you!"

Before you shake your head in disbelief and hit the "Back" button, let me just say that if you've ever played with playdough you can make this pie. If previous attempts have found you sweating into the pie crust as you attempt to roll it out then carefully lifting the crust into the pie tin only to have it fall into shreds, worry no more. This Dutch Apple Pie recipe asks you to do nothing more than smush the bottom crust into the pan and half crumble/half spread the top crust on.

Recipes for Dutch Apple Pie date back to 17th century Netherlands. The lack of a full pie crust on the top and additions of cinnamon, lemon juice or raisins are what distinguish a Dutch Apple Pie from the other variations.

This recipe took me 30 minutes to prepare; twenty of those minutes were spent on the apples. While you could save time and use canned pie filling you'll sacrifice taste. It's up to you but, in the grand scheme of things, what's 20 minutes? Your taste buds will thank you.

In days gone by I've substituted margarine for butter. Use margarine if you need to but once you taste the difference when you use butter you'll never substitute with margarine again. Buy the cheapest butter; brand doesn't matter here. And always use unsalted butter for baked goods, salted butter for cooking. That being said, it's time for the recipe:

Dutch Apple Pie

Ingredients:

1 cup butter, melted
1 cup white sugar
1 egg
2 1/2 cups flour
8 large tart apples - peeled, cored and sliced about 1/4" thick
Ground cinnamon

Directions:

1. Preheat oven to 350 degrees F (175 degrees C).

2. In a mixing bowl, combine butter, sugar, egg and flour. Stir with a spoon for a few moments until mixture hangs together a bit. Use flour-covered hands to form dough. If the dough seems super-sticky, mix in another 1/4 to 1/2 cup flour. Press a little more than half the dough on the bottom and sides of 9-inch pie dish, square baking pan, or cast iron skillet.

3. Fill the pie shell with apples and dust them with cinnamon. (I was generous with the cinnamon and could have added more.) Crumble the rest of the dough over the top of the apples until they are more or less covered. Bake in preheated oven for 45 minutes.

Baking Tip: Give your pie crust a golden brown shine. Beat one egg yolk and 1 tsp. water then brush the mixture onto the top pie crust before baking.


This Dutch Apple Pie may not win a beauty contest but it makes up for it in taste!


Ahhh...the Comforts of Food

At one time or another we have all sought comfort in food. Whether the comfort comes from cooking, baking, ordering or tasting is as individual a choice as the type of filling you like in a fruit pie. Food has the power to single-handedly relieve stress, ease the pain of a broken heart (if even for a moment), or fill the heart with joy. One taste can evoke memories from childhood, transport us to a foreign country, or propel us into a zen-like state of euphoria. For whatever reason, we eventually all seek the comforts of the kitchen.

Ina Garten, the Barefoot Contessa, says: “Food is not about impressing people. It's about making them feel comfortable.” Aside from the obvious factors of sustenance and health, the most important thing about food is that you enjoy it. After all, we all need a little joy in life. Regardless of whether you eat alone or cook for many, when the process of doing so makes you smile, breathe a sigh of relief, or brings peace to your heart then you have found the comforts of the kitchen.

For those with a love of anything food-related, I dedicate this blog to you. Bon appetit!